


Sometimes you just want it to be completely individual. That's why Luise from Weimar decided to put her handicraft skills to the test: To build a separating toilet for the garden herself.
She shares the individual construction steps with us and gives us important tips on how to realise the project well and cheaply. The result is definitely something to be proud of and hopefully inspires one or two others to start their own separation toilet adventure.
Seek and you shall find
Once upon a time, Luise set out to find a mobile and sustainable toilet that would use neither electricity, nor chemicals, nor water. It also had to be easy and uncomplicated to use and just as easy to build. The shortlist included the incineration toilet, the traditional composting toilet and the dry separation toilet.
The first one was quickly eliminated. This is because incineration toilets have to be connected to an exhaust pipe that needs electricity to work. The permanently installed pipe also makes it impossible to move the toilet to another location.
In a traditional composting toilet, all excreta fall into a container and are composted directly in it. Since this container has to be relatively large, such a toilet is unfortunately also not mobile. The mixture of urine and solids means that they cannot be recycled individually, and unpleasant odours quickly arise.
So there was only one sensible solution left: the dry separation toilet.
A good choice! Especially since it is also important to Luise that she can use her excreta directly as fertiliser. Because she has a garden area of almost 500 square metres. Buying fertiliser in a shop is out of the question. After all, it is easy to make it yourself. She puts solid matter together with leaves, green cuttings and kitchen waste in a quick composter. This produces fresh soil within a few months. She can immediately use the collected and diluted urine as liquid fertiliser.
Stable and inexpensive - the shopping list for your do-it-yourself separation toilet
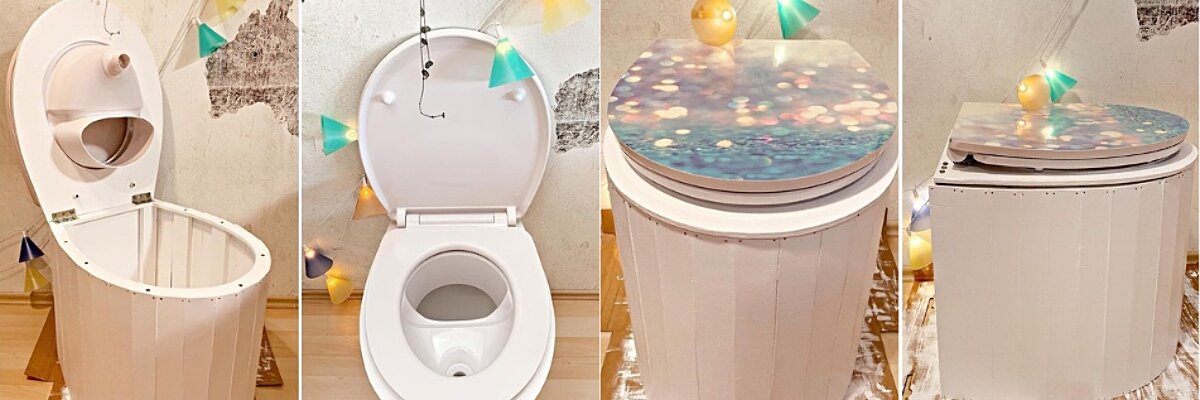
Now it's time to implement the perfect plan. Luise draws up a sketch and a list of materials with all the things she wants to buy for the dry separation toilet. Included is our FreeLoo kit with diverter and canisters, as well as the trap from Kildwick. She was also satisfied with our beetroot cleaner straight away.
The wood comes from the DIY store: a glueboard for the floor, toilet seat support surface and toilet flap. Poplar plywood for the exterior panelling. In addition: hinges, rubber feet, glue, screws, mouldings and paint. The cost is about 243 euros.
In the spirit of sustainability, she also finds some used wood in her garden. A toilet seat for the self-built dry separation toilet is already available, as a conventional toilet was previously installed at the desired location.
Yes, Luise has actually replaced a functioning water toilet with a separation toilet!
Now all the parts are together and we can start.
Roll up your sleeves - How women can build their own dry separation toilet
Before the big guns are brought in, Luise puts on the folding rule and sketches out the planned cuts according to the measurements of her toilet seat and the canisters. Then they cut the hell out of it.
- Floor
- Cut-out for the diverter
- Narrow support edge for the cut-out for the diverter
- 9 small support strips
- Back wall
- Small boards made of plywood for the outside panelling of the loo
All the parts, except for the outside panelling and the support strips, are then carefully sanded down to make them comfortable to sit on.
Then - Luise adds some colour. It makes sense to do this before assembling the toilet, because this way every corner of the wood is well protected from moisture. Since the white spray paint was not really opaque, we had to help out with a brush and varnish.
After everything has dried, the drill comes into play. Luise drills holes around the base, the support blank and the ends of the support strips. Now the parts can be joined with screws and the diverter is put in place. Just like the back wall. Then the diverter is hinged so that it can be opened and closed. For the grand finale, the small boards are nailed all around. Put the toilet seat on top and the self-made dry separation toilet is ready.
Now the canisters can find their place. Luise connects them with the odour trap, which lets urine through and then closes again securely.
Conclusion: everything fits like a glove.
Learning by doing - that didn't go quite so smoothly
It would be boring if everything worked perfectly right away. Otherwise there would be nothing to learn from it. In this sense, Luise didn't take it personally when her first diverter broke into two pieces right after completion. This is how she found out that the plate was too thin.
She went to the DIY store again to buy a more stable board with a thickness of 1.8 mm. This turned out to be perfect and robust. She had a similar experience with the support strips, which also had to be retrofitted to a size of 24x48mm.
Luise's tip to anyone who wants to build a separation toilet themselves:
The wood for the toilet should not bend under load and should be made of one piece of wood.
But be careful: You can't necessarily tell right away if the board is coated with paint. So it's better to ask twice.
The most important thing in such a do-it-yourself project is to have a lot of fun while building and to take it with a sense of humour if something doesn't work out the way you had imagined.
In the end, it doesn't matter that the toilet is a little too narrow and the canisters have to stand a little crosswise.
Hard work pays off - that's why @guiltyhot loves her self-built dry separation toilet.
It took a few days for Luise's toilet to be finished. But it was worth it, because now she is totally happy with her result and enjoys it every day. The toilet is stable, easy to use and quick to clean.
In addition, the toilet is a real eye-catcher with its stylish panelling made of narrow poplar plywood strips. These are attached with gold-coloured nails and give the throne a classy touch.
The self-built dry separation toilet has meanwhile proved its worth and Luise's garden has already benefited from home-made fertiliser. The plants are at least as happy about this as Luise herself.
By the way, she also makes the litter for the toilet herself. From old, dry branches, wood chips, leaves and plant stems, which are chopped and sieved.
Would that be your thing too? - Here's what you need to make your own separation toilet
This is Louise's list of materials for reference and re-purchase:
- 1 glue-laminated spruce/fir board (cut-outs for base board, rim, divider board).
- 9 support slats (cuttings of equal length from two longer wooden slats)
- 18 screws in total for fastening the slats between the bottom panel and the rim
- Glue (PVC glue) for gluing the diverter into the plate provided and cut to size for it
- 2 hinges
- 12 screws to fix the hinges between the rim and the dividing insert plate so that it can be folded up
- 1 poplar plywood panel (panelling cut to size in strips)
- many small nails (4 per cladding strip, each nailed to the base plate and to the top of the edge of the box) [available].
- Wood glue to close the gaps in the panelling so that the box is tight [available].
- 1 can of white varnish (125ml) [purchased]
- Toilet seat [available, bought for the old toilet shortly before]
We wish you good luck and are looking forward to seeing more inspiring self-built dry separation toilets! Of course, we'll be happy to share one or two results with the rest of the community here.
First of all, many thanks to @guiltyhot for the great inspiration!
And if you're looking for more inspiration, you might find what you're looking for in this blog post on building your own separation toilet.