


Although he initially only wanted to build a simple dry toilet for his van, two projects worth seeing emerged from the idea in the end.
In this part of our "Do it yourself" category, we therefore introduce you to an absolute expert:
Andreas from german Burgenlandkreis has been on the road with his wife Billy since February 2020. You can follow them at @fluchtvan. Because in their Sunlight Cliff 640XV, they regularly escape from everyday life. True to the motto: van on, everyday life off.
Always with them: their dry separation toilet. Here Andreas tells you how he went about building it himself.
Building a dry toilet yourself 1.0 - The first attempt is not yet entirely out of conviction
There were times when Andreas relied on a chemical toilet. But times are changing, and for good reason. Firstly, chemical toilets are not good for the environment and secondly, their contents always have to be disposed of in a unpleasant way. And the two of them are fed up with the time-consuming stops at disposal stations.
So they need an alternative. So Andreas half-heartedly sets about the project: building a dry toilet himself. The idea is to make it as simple as possible - just in case it ends up in the bin. The installation should be done in such a way that the mobile toilet can be quickly removed from the van without leaving any traces.
At this point, Andreas cannot even imagine what a lasting impression the dry separation toilet will make.
Accordingly, he naturally wants to save costs, while still focusing on high quality. So it happens that the Kildwick XL diverter, the 9.5 L wide-neck canister and the large solids container soon arrive at his home. A toilet seat is also procured, and the rest is found in the garage. It was also important to Luise aka @guiltyhot to use existing material when building the dry seperation toilet herself.
Fortunately, Andreas still has a 20 mm thick wooden plate. Soon, the solids and urine containers will be placed on this to provide a sample for the width and depth of the separation toilet. The height is determined by the urine container and the separating insert.
Andreas builds the entire separation toilet from the wooden plate. But this makes the toilet quite heavy. So the side walls are replaced by a sheet of aluminium. This is folded and inserted. The first prototype is ready for use.
From doubter to fan - now it's time for optimisation
Cautiously, Andreas tries out his self-built separation toilet. It is used on a first small trip. Contrary to expectations, Andreas is immediately enthusiastic about the mobile toilet.
Full of enthusiasm, he soon sets about optimising the self-built separation toilet. To do this, it has to be completely dismantled so that it looks good.
It is to be made a little narrower and covered with plywood. The supporting frame is made of plywood, too. To be safe, Andreas decides to paint the wood from the inside to make it waterproof. On the outside, the plywood is treated with a caring oil.
The whole thing is further optimised by a small PC fan. Andreas installs it in a 40 mm HT pipe. Now it is supposed to suck unpleasant odours out of the box. We remember: Jens aka @moglis_papa also used a few fans when building his own dry toilet.
So much creativity must actually be rewarded with a perfect result. But unfortunately the solids container no longer fits in the box. It has to be replaced with a household bucket. That's good too. That's how it should be, that's how it should stay for now.
Building a dry toilet yourself 2.0
His first creation still provides a lot of joy and satisfaction today. However, it can now be found in Andreas' craftsman's van. A completely new creation is needed for the escape van.
Andreas doesn't want to do much different with his second model, because version 1 works perfectly. After some thought, however, there are a few points that could be improved: A smaller body would be nice, as well as a more elegant shape and space for a larger urine container. In addition, the ventilation system of the mobile toilet should be lockable.
A look into the garage once again promises a lot. This time there is a 15mm multiplex board, a vinyl board, fans, hoses, buckets and other odds and ends. In other words, everything a do-it-yourselfer's heart desires.
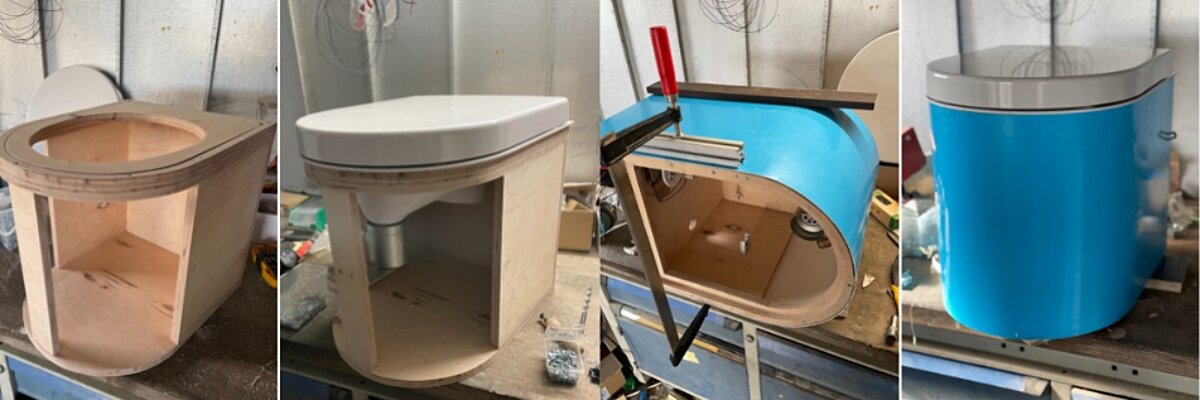
When Andreas has received the diverter, siphon and a 30-litre urine container, it's time to start building the dry toilet again. This time it's round. The body is quickly sawn out and covered. Finally, Andreas puts a little blue on it. What a splendid piece!
Then the craftsman faces the real challenges
The toilet is now smaller, but the urine container is bigger. This means that the container has to go (to be connected externally) and give way to the bucket. Briefly, the idea of placing the collection bucket outside the van was considered, but while reflecting on it, the idea turns out to be unsuitable for winter. So, without further ado, it is installed in the storage space under the bed. This creative solution is rounded off with a level indicator visible above the toilet.
Now all that's missing is the perfect fan. Andreas builds a housing from the multiplex board and a slider from a piece of vinyl. This is then coated with felt so that it glides nicely. He screws the little work of art to the inside of the dry separation toilet and connects it to a small PC fan. This sucks out the exhaust air and leads it to the exhaust air flap via a hose. When the flap is closed, the fan also turns off and no more air can get in from the outside.
Now we know why Andreas really deserves the title "pro".
Thank you Andreas for your inspiration - completely out of conviction
With admirable skill and ingenuity, Andreas was able to build his two dry toilets himself. And this despite the fact that he was so suspicious of the whole project at first. But now he is completely satisfied with the result.
In the new year we will continue with a lot of creativity and individual handwork - be curious!
Until then, Merry Christmas and a very Happy New Year.