


We have already read a lot about Marcus aka Mogli from Vanlust. In an interview about the growing vanlife community, he told us what matters when it comes to living consciously in a van. And also how #vanlife has changed in recent years. In his podcast from December 13th-19th, he will be auctioning off a MiniLoo Vanlust Edition, which is otherwise only available exclusively at Kildwick. Our much-loved partition toilet with burnt-in outdoor van design, which we developed together with him.
Now we'll let Mogli's dad have a word. Because the apple doesn't fall far from the tree. Jens also likes to travel in the van and has built himself a dry separation toilet.
A really quiet place - toilet feeling like at home
Living in a van is in this family's blood. In summer 2019, Jens sets off for Scotland with his roof tent. Unfortunately, the trip falls through and it quickly becomes clear: a van is needed, including a decent mobile toilet!
The following year, Jens has the opportunity to buy a van and build it out himself. The new family member is christened "Willi" and the construction of the separation toilet can begin.
It is particularly important to Jens that he has his privacy in the toilet. That is why it is to be housed in a small, separate room. It is to be located directly behind the driver. Before the walls are put up, the available space must be carefully measured.
It is essential to take your own leg length into account! After all, who wants to do their business with bent legs?
Building a separation toilet yourself - this is how Jens tackled it
Jens has already had good experiences with dry separation toilets. He has even tried out one or two of them. His son Mogli is always raving about the advantages of a portable toilet, too. Accordingly, the decision was made quickly: Jens also wants to build a separation toilet himself.
So they´re more than happy when the FreeLoo kit with the XL diverter is delivered. Now it's off to the workshop.
Jens builds a support frame from wooden poles with a diameter of 4x6 cm.
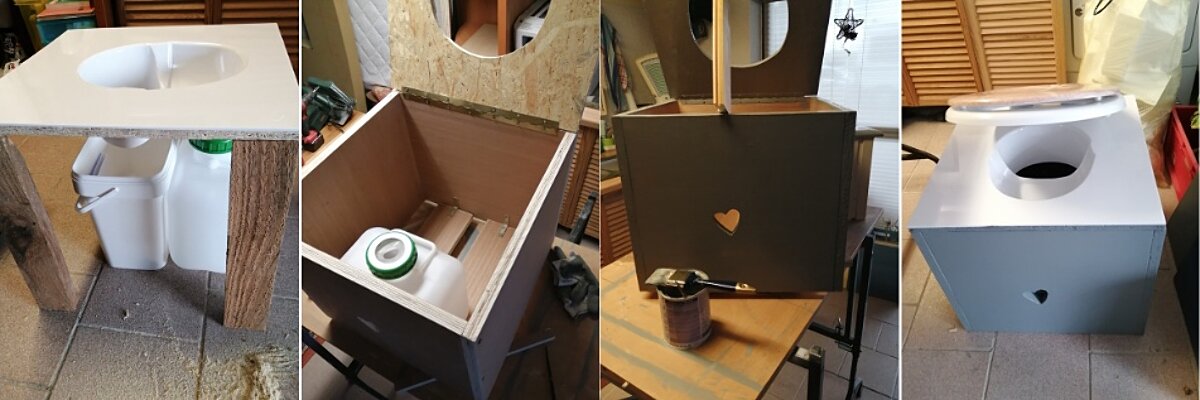
For the support of the separator he decides on a 12mm thick OSB board. This is measured in order to saw out the opening for the deverter. Now the separator can be glued firmly with an elastic strong glue.
The next step is to build the toilet box out of industrial plywood with a thickness of 22 mm. The advantage of plywood is its lightness. Because when fitting out a van, every kilo often counts. Fortunately, there was already plenty of the light material on site, as it had already been used in the construction of the kitchen and bed.
But watch out: As we learned from Luise @guiltyhot, the material must be light, but never too thin.
Jens now fastens the finished lid including the diverter with a piano hinge - a long furniture hinge made of metal strips. This way it can be easily opened and closed again.
Before the first test can start, the wood is embellished and sealed with an acrylic profile varnish. Afterwards, the tanks find their intended place. To keep the dry separation toilet mobile, Jens decides to attach two floor beams with hinges.
Everything is ready for use. A toilet lid is quickly screwed on and the self-built work of art is finished.
Trust is good - a seat test is better
Soon the toilet room will be ready and the project can be put to the test. Because an extended trial session is definitely advisable. And that's before you really go on tour.
It turns out that the toilet is not ideally placed at an angle in the room. That's why we change our plans and put the toilet with its back to the direction of travel. From now on, no more sloping things! This has the advantage of freeing up space for the fresh and waste water tanks in the toilet compartment.
Everything fits, perfect.
Odourless success in a small space - with a little love
The first outing is a great success, too. Jens proudly presents his self-built dry separation toilet at the nature campsite. He particularly likes how quickly and easily the toilet can be cleaned.
But despite all the scrubbing, Jens hears one or two fragrant breezes. Reason enough to retrofit and install a fan. To be on the safe side, Jens also drills air holes in the box and equips the box itself with a fan. A clever move for sensitive noses.
And since the tools are already at hand, Jens takes this as an opportunity to saw out a little heart from the front of the box. The small opening now makes it easy to check the fill level of the wide-neck canister from the outside.
Able to cope with any traffic jam - thanks to a dry separation toilet
With heart and mind, Jens has now finished his dry separation toilet. Now nothing takes him away from longer journeys with "Willi". Even if it rains or if the bladder is squeezed during a long traffic jam.
So maybe we will soon be able to report on shared van adventures with his son Mogli.
Until then, we'll introduce you to some more homemade separation toilets. In our new category "Do it yourself" you will find regular inspiration and instructions on how to build your own dry separation toilet.
Look forward to it!
Your Kildwick Team