So, now you know everything you need to know and we can get started with the instructions on how to build a separation toilet yourself at a reasonable price:
Materials needed
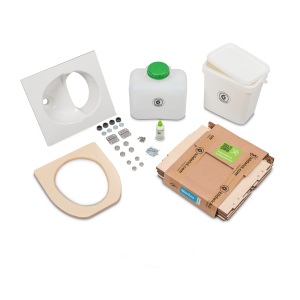
You need...
For the interior:
1 PE canister (e.g. 13 litres) with an opening at the top in the middle (urine canister)
1 plastic bucket the size of a bathroom waste bin (solid waste container)
1 separating insert (urine separator)
For the construction (fixed installation):
Wooden slats and wooden boards/MDF panels corresponding to the size to be covered. Screws, angles
For the dry separation toilet "to go":
1 box that can hold you sitting down and is stable and that both containers fit into
1 suitable and flat (!) lid for the box
1 wooden board as a cover in the size of the box
Good glue (e.g. epoxy resin)
Other:
1 toilet seat with lid (toilet seat)
By the way: If everything is too complicated for you, buy a Kildwick kit for dry separation toilets. The toilet kit contains all the parts in the right size, so you don't have to saw or cut anything! More info in the shop.
Instructions for your dry separation toilet
Variant 1: Installing the separation toilet permanently as a bench
If you want to install your separation toilet permanently, follow these instructions:
Step 1: Measure
Measure the space you want to cover. This will also help you to find out how big the inside of your toilet can be. The advantage of fixed seperation toilets is that you have more space and can fit larger canisters.Then you can collect the materials in the required size or buy them at the DIY store.
Step 2: Build the basic structure
Once you have bought all the materials, the next step is to build the basic framework from the wooden slats. You can then screw the wooden or MDF panels for the panelling to these.
The procedure is as follows:
- Cut the wooden slats to size
- Build a "frame" from them and screw it together.
- Secure the frame to the walls and floor.
- Check the frame for stability: You should now already be able to sit on it (the frame supports the construction!).
Attention! When building the scaffold, make sure it is the right height to sit on! The scaffold should not be higher than 43 cm.
Step 3: Covering the base frame
Now you can cut the boards for the cladding and screw them on.
Attention! The top panel should have an opening the same size as the opening of the toilet seat, where the toilet seat will be placed. Make sure that the opening allows a comfortable sitting position. Also remember that the hole must be large enough for the canisters. Alternatively, you can attach the top plate with a hinge so that you can simply lift the entire plate, including the mounted toilet seat, to empty the canisters.
Tip: You can also cover your self-built separation toilet with tiles!
Step 4: Collecting tank & urine separator
Now it's time for the interior of your dry separation toilet:
- First place the solid container (bucket) in the back
- Then place the urine container in the front
- The containers should be placed in such a way that the urine separator can be positioned correctly on them: in a way that the openings of the diverter match those of both containers
- You may have to slightly adjust the position: Position the container for solids so that it matches the rear opening of the separator
Note: Building a urine separator yourself - is that a good idea? As a motivated do-it-yourselfer and self-made man or woman, you might also want to build the insert for the urine separator yourself. However, this is really only something for professionals. Because the shape is relatively demanding and so is the material: it has to be waterproof, easy to clean, easy to shape and yet stable. Therefore, instead of trying to make the urine separator yourself, we recommend buying a separator insert. You should not save money in the wrong place, because a good diverter is essential for good functioning and convenience of your separating toilet!
Step 5: Toilet seat & toilet lid
Your dry separation toilet is almost ready! Now it's just a matter of fitting the toilet seat. Most of the time, the toilet seat is already fitted to the toilet seat anyway.
Since most toilet seats are simply fastened with two screws and nuts, mounting them is not very difficult:
- Drill two holes in the wooden panel behind the opening at the right distance apart.
- Position the seat correctly
- Insert the screws through the holes from above.
- Tighten the nuts from below
And you've built your own separation toilet! But, wait...
Step 6: Install the ventilation (optional)
Depending on the type of ventilation, you may have to do this beforehand. It depends on the construction plan of the ventilation - just follow it. We would be happy to refer you to our assembly instructions, which you can find in the Kildwick Support.
Now let's take a look at how you can build the portable separation toilet yourself:
Variant 2: Build your own camping toilet as a portable separation toilet.
For the portable dry separation toilet for camping, the instructions are even simpler:
- Simply cut the wooden board to the size of the lid. It serves as reinforcement for the lid when you sit on it and to mount the toilet seat.
- Cut a hole the size of the toilet seat opening in both the lid and the wooden plate so that the two holes overlap exactly.
- Glue the wooden plate to the lid.
- Now put the divider on top (screw or glue).
- Glue or screw the toilet seat to the wooden plate with the separating insert glued to the lid.
- Continue with step 4 as explained for variation 1.
Note: If the lid is very stable, you can leave out the reinforcement by the wooden plate (but then you can only glue).
Variant 3: Separating toilet kit
Finally, you can of course build your perfect separation toilet with our simple Kildwick kits. The advantages are obvious:
- no hassle due to wrong measurements
- no hassle due to missing or mismatched parts
- no hassle due to unstable construction
- no loss of time
- easy and clean emptying
- easy and clean emptying
Check out our separation toilet kits here:
With our Kildwick kits, your partition toilet will look great too. Best of all, you can customise your toilet to your own specifications. So individualists and creative minds will also get their money's worth with our kits.


 Go to item319,90 €incl. 19% VAT , plus shipping costsOld price: 379,90 €
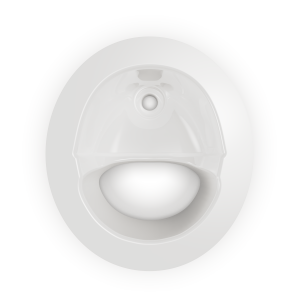 Go to item79,00 €incl. 19% VAT , plus shipping costsOld price: 129,90 €
 Go to item14,90 €0,88 € per 1 lincl. 19% VAT , plus shipping costs